Convoy From Alexandria To Malta meets and engages Italian warships in the Mediterranean, 22 March 1942. HMS Cleopatra throws out smoke to shield the convoy as HMS Euryalus elevates her forward 5.25-inch guns to shell the Italian Fleet
80rrwpebkym41.jpg


HMS INDOMITABLE, pictured in early 1943. Note the Seafire on the outrigger just behind S2 4.5in and in front of S1 Pom Pom.
image-asset.jpeg


Left to right: HMS RODNEY, WARSPITE, a Cruiser, HMS NELSON and cruisers of Force H in the Ionan Sea, July 10 to 16.
image-asset.jpeg


HMS WARSPITE, with Seafires of FORMIDABLE in the foreground, part of Force H in the Ionian Sea.
image-asset.jpeg


Seafire flying over HMS Indomitable, 1943
u4sz04y9anm41.jpg


Operation Husky: The Sicily Landings 9 - 10 July 1943: The invasion fleet at sea, viewed from the bridge of one of the ships.
image-asset.jpeg
 
The Sicily Landings 9-10 July 1943: HMS ESKIMO patrolling the landing area off the coast of Sicily, while in the distance a supply ship burns after being hit by enemy aircraft.
large.jpg


HMS INDOMITABLE is seen over the Seafire 'ready' park aboard HMS FORMIDABLE, with the battleships RODNEY and NELSON. Force 'H' is pictured here in the Ionian Sea just hours before INDOMITABLE was torpedoed.
large.jpg


HMS RODNEY and her destroyer laying a smoke-screen, seen from the flight deck of the FORMIDABLE.
large_000000+%284%29.jpg
 
HMS Hood and Valiant under attack, along with HMS Ark Royal, from whose flight deck the photo was taken, by Italian SM79 bombers, in the Western Mediterranean on 9 July 1940
xn8gubwhc8m41.jpg
 
HMS Glorious in May 1940 from the deck of HMS Ark Royal, with her is destroyer HMS Diana
do1pO3pl.jpg
 
A British naval armed guard looks on as a German submarine rating carries torpedo parts from surrendered U 826 at Loch Eriboll, Scotland as Germany's U-Boat fleet began its surrender to the forces of the Royal Navy.
K-AHyEZB-1dXRCxdc2rvtFraE8WEkzQBfF2gYVMEC5k.jpg
 
RAN:
The battle between the Australian light cruiser HMAS Sydney and the German auxiliary cruiser Kormoran was a single-ship action that occurred on 19 November 1941, off the coast of Western Australia. Sydney, with Captain Joseph Burnett commanding, and Kormoran, under Fregattenkapitan Theodore Detmer, encountered each other approximately 106 nautical miles (196 km; 122 mi) off Dirk hartog Island. Both ships were destroyed in the half-hour engagement.

All hands were lost with HMAS Sydney
zcxwncgrreo41.jpg
 
2nd Battle of Sirte. HMS Kipling at high speed in heavy seas during battle.

During the Second Battle of Sirte the escorting squadron of five light cruisers and 18 destroyers was confronted in very stormy seas by a greatly superior Italian surface force. The convoy also came under attack from several hundreds of German and Italian aircraft operating from Sicily, Libya and Greece. Undaunted, the Royal Navy ships shepherded the four merchant ships under the cover of smoke screen in mountainous seas to keep the battleship at bay until at dusk, the Italian squadron, unable to fight a night action, withdrew back to Messina and Taranto.

The four merchant ships managed to steam towards Malta but one, Clan Campbell, was sunk by the Luftwaffe just short of Grand Harbour and another, Breconshire, was disabled and later sank in Marsaxlokk Bay.

"Italian squadron made of a battleship, 2 heavy and 1 light cruiser and 10 destroyers have been held off by the relatively light convoy defences made up mostly of anti-aircraft cruisers and destroyers. Superior Italian squadron had failed to engage the merchant ships or sink any of the allied ships, and have lost 2 destroyers in a storm in the aftermath."

Lord Cunningham in his book A Sailors Odyssey says:
‘I shall always consider the Battle of Sirte, on March 22nd 1942, as one of the most brilliant Naval actions of the War, if not the most brilliant. As told here it sounds easy; but it is against all the canons of Naval Warfare for a squadron of small cruisers, and a handful of destroyers to hold off a force of heavy ships . . . had the roles been reversed, it is unthinkable that the convoy, or much of its escort would not have been destroyed.’
psml3rl7m4o41.jpg
 
The untold story of the forgotten Secret Service heroes of World War II: members of the elite MI-14 division, the intelligence group in charge of carrier pigeon operations. Pigeons such as Winkie, G.I. Joe and Mary of Exeterwere dropped behind enemy lines by parachute and took part in some of the most daring missions of the war. With testimony from surviving bird trainers and access to recently declassified documents, this film reveals the crucial role pigeons played in saving the lives of soldiers and airmen, and the epic battles they fought against killer falcons.
To view this content we will need your consent to set third party cookies.
For more detailed information, see our cookies page.
 
Men of the 2nd Sherwood Foresters firing a captured German MG42 machine gun, Tunisia, 27 April 1943

qgyykvoilbp41.jpg
 
The last photo taken of HMS Hood, taken from HMS Prince of Wales, as the two ships prepare to engage Bismarck - 24th May 1941
ewl8rjwg3mp41.jpg
 
WOW.......that is just great!! Haunting but great picture of our Royal Navy legend the mighty HMS Hood!!

I must say now so many years later and this picture sets this up take a look at that sea state and the waves, I'm not a Navy man nor pretend to know much about naval gunnery but that was some lucky or amazing gunnery to have hit her in that rolling rough sea (or maybe it wasn't?)
 
126.jpg


Lulu, the pet hen and mascot of the 6th New Zealand Field Ambulance Dressing Station, Italy, March 1944.
 
HMS Biter (Leading) and HMS Avenger as seen from HMS Victorious, August 1942.
ItV0kyKl.jpg
 
South African Beaufighter from 19 Squadron attacking targets in Yugoslavia (1945)
0e7p3t4n2tq41.jpg
 
H.M.S. Jamaica's starboard-side torpedo tubes
fgx0r5xp6ur41.jpg


HMS Trinidad after receiving fatal damage from German bombers, May 14, 1942, as seen from one of the escorting destroyers. She would be torpedoed the next day by HMS Matchless
07642-728x404.jpg


Axis recon photo of HMS Queen Elizabeth and HMS Valiant a few days after being heavily damaged by Italian manned torpedoes, Alexandria, December 1941
j7qaxzo5tsr41.jpg
 
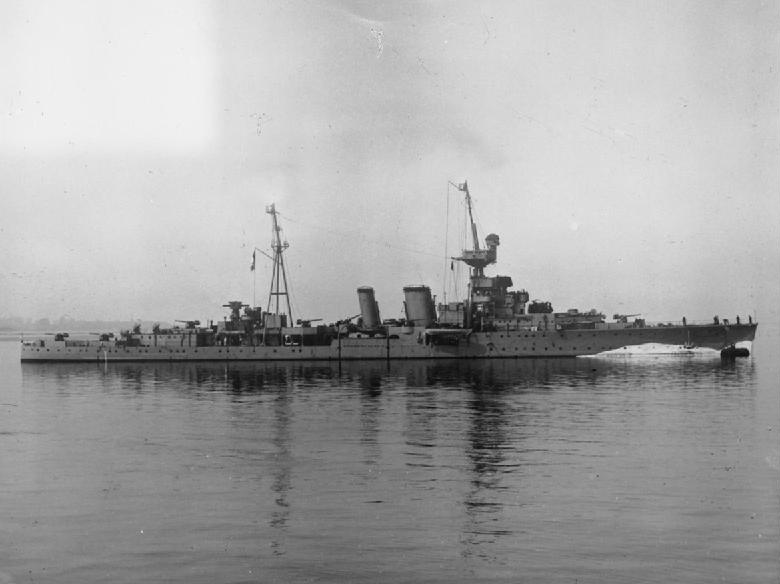
HMS Glowworm makes smoke moments before ramming the German heavy cruiser Admiral Hipper.
cyttfqv6vlr41.jpg


HMS Glowworm was a G-class destroyer built for the Royal Navy in the mid-1930s. During the Spanish Civil War the ship spent part of 1936 and 1937 in Spanish waters, enforcing the arms blockade imposed by Britain and France on both sides of the conflict. Glowworm was transferred from the Mediterranean Fleet shortly after the beginning of World War II to the British Isles, to escort shipping in local waters. In March 1940, she was transferred to the Home Fleet, just in time to participate in the opening stages of the Norwegian Campaign. On 8 April 1940 Glowworm encountered German destroyers transporting troops to invade Norway in Operation Weserübung. The destroyers attempted to disengage while calling for help from the heavy cruiser Admiral Hipper. Glowworm was heavily damaged by Admiral Hipper, but still attempted to torpedo the German ship. In chaos of the battle, the heavily damaged Glowworm ended up ramming Admiral Hipper, which broke the bow off Glowworm, and she sank shortly afterwards.

On the morning of 8 April 1940 Glowworm was on her way to rejoin Renown when she encountered the German destroyers Z11 Bernd von Arnim and Z18 Hans Lüdemann in the heavy fog before 8:00 a.m. The destroyers were part of a German naval detachment, led by the heavy cruiser Admiral Hipper, on its way to land troops at Trondheim as part of the German invasion of Norway (Operation Weserübung). Glowworm opened fire and the German destroyers attempted to disengage, signalling for help. The request was soon answered by Admiral Hipper which spotted Glowworm at 09:50. Hipper initially had difficulty in distinguishing Glowworm from von Arnim, but opened fire eight minutes later at a range of 8,400 metres (9,200 yd) with her 20.3-centimetre (8.0 in) main guns. Glowworm was hit by Hipper's fourth salvo and she started making smoke. She turned into her own smoke in an attempt to break visual contact with Hipper, but the cruiser's radar-directed guns were not affected by the smoke. When the destroyer emerged from her smoke the range was now short enough that the cruiser's 10.5-centimetre (4.1 in) guns could fire. Glowworm's radio room, bridge, and forward 4.7-inch gun were all destroyed, and she received additional hits in the engine room, the captain's day cabin, and finally the mast. As this crashed down, it caused a short circuit of the wiring, causing the ship's siren to start a banshee wail.

At 10:10, Lieutenant Commander Gerard Broadmead Roope fired five torpedoes from one mounting at a range of 800 metres (870 yd), but all missed because Captain Hellmuth Heye had kept Hipper's bow pointed at Glowworm throughout the battle to minimise his risk from torpedoes. The destroyer fell back through her smoke screen to buy time to get her second torpedo mount working, but Heye followed Glowworm through the smoke to finish her off before she could fire the rest of her torpedoes. The two ships were very close when Hipper emerged from the smoke and Roope ordered a hard turn to starboard to ram the cruiser. Hipper was slow to answer her helm and Glowworm struck the cruiser just abaft the anchor. The collision broke off Glowworm's bow and the rest of the ship scraped along Hipper's side, gouging open several holes in the latter's hull and destroying her forward starboard torpedo mounting. One German sailor was knocked overboard by the collision. Hipper took on some 500 tonnes (490 long tons) of water before the leaks could be isolated, but was not seriously damaged. Glowworm was on fire when she drifted clear and her boilers exploded at 10:24, taking 109 of her crew with her.

Admiral Hipper hove to in order to rescue her man overboard and Glowworm's survivors. The German sailor was not found, but 40 British sailors were recovered, although at least six later died of their wounds. Lieutenant Ramsay, the senior surviving officer, told his rescuers that neither the helm nor the emergency rudder were manned when the ships collided so the destroyer's turn towards Hipper was probably accidental. German accounts only mention four torpedoes fired by Glowworm, but British accounts say all ten were fired. This was confirmed by photographic evidence taken after the collision showing all of her torpedo tubes empty.

Roope, who drowned when he could no longer hang on to a rope whilst being pulled up the side of the cruiser, was posthumously awarded the Victoria Cross, thus becoming the first VC recipient of the Second World War. The award was justified, in part, by the recommendation of Heye, who wrote to the British authorities via the Red Cross, giving a statement of the valiant courage Roope had shown when engaging a much superior ship in close battle. Ramsay was also awarded the DSO. Both awards were made after the end of the war.

HMS Glowworm on fire in the ongoing battle against Admiral Hipper, an unknown photographer, possibly a sailor from the Admiral Hipper with HMS Glowworm drifting away after the collision with Admiral Hipper.
Glowworm_in_flames.jpg
 
A Supermarine Walrus flying boat is launched from one of the aft catapults of HMS Pegasus, a seaplane training and convoy defence vessel of the Royal Navy during the Second World War. The unique angle of the photo, taken from below on the aft deck, speaks of the speed of the launch which sent the Walrus from zero to 70 mph in less than a second. Pegasus was the world’s first purpose-built aircraft carrier (actually a seaplane tender), and was launched as HMS Ark Royal in the First World War, but renamed Pegasus in 1934 when the wartime fleet carrier we know as Ark Royal was first laid down. At the time of this photo, September 1942, Pegasus was a catapult training ship, training pilots for CAM ships (Catapult Aircraft Merchantman) and for Walrus rescue duty. She was operating near Lamlash, Scotland. Photo: Imperial War Museum, © IWM (A 12032)
yxjxgmtu8mr41.jpg
 

Similar threads

Back
Top